Post Top Ad

3:24 PM

Top 10 Outdoor Photoshoot Locations in Singapore

by Label as
This post has been shifted to:
https://cloudproductions.sg/2014/11/top-10-outdoor-photoshoot-locations-in-singapore/

Thank you for visiting!


_______________________________
This Blogpost is written & copyrighted by Sgcloudproductions , Thank you for spending time reading our Blog! We hope you’ve enjoyed this post and discover something new here! We look forward to the Photoshoot with you!


Cheers,
Cloud Productions Team
hey [a] cloudproductions.sg
+65 8749 3850
9:23 AM

8 Creative & Essential Wedding Detailed Shots You'll Need!

by Label as
Apart from Gatecrashing, there are many more creative detailed shot you will never want to give it a miss on your wedding actual day!
Here are the top 8 on the list:
(ONE)
Those makeup and behind-the-scene shot
(TWO)
The dressing and dressed up shot
(THREE)
The Wedding Ring on your finger Shot

(FOUR)
The Wedding Car Decors
(FIVE)
The Banquet Environment & Decor Shots
(SIX)
The moment for Pre-wedding photoshoot on your actual day!
(SEVEN)
The Decors at the Reception area
(EIGHT)Last but not least, the Kissing moment.
Love our photos? Look us up, and follow us:

__
This Blogpost is written & copyrighted by Sgcloudproductions , Thank you for spending time reading our Blog!
8:00 AM

8 Tips for Taking Stunning Photos of Cats

by Label as

Taking photographs of pets can sometimes be as challenging as shooting children to most people. They moved quickly in seconds and you'll never know what is their next move. But with a few simple tricks and camera settings to keep in mind, it's not impossible to capture amazing, professional looking photos of these important family members... worth hanging on the wall next to your family photo. 

To help you take great pet photos, here are 8 Tips for Taking Stunning Photos of Cats:

1) BE IN A CLEAN & UNDISTRACTED SURROUNDING
It is most recommended to have a less distractive background so you undistracted and easier to bring out the mood/ambience in the surrounding.


2) WATCH OUT FOR EXPRESSION
Yes, Every Cat have different characters and has their very own unique expression. Capture the Cat's personality.


3) STALK YOUR CAT
Understand cats, knowing their habits helps you in bringing out the natural beauty in them.


4) SAY NO TO FLASH
If you are not familiar with external flashes, we don't recommend you to use internal or direct flash. You might distract the Cat and scare them away.

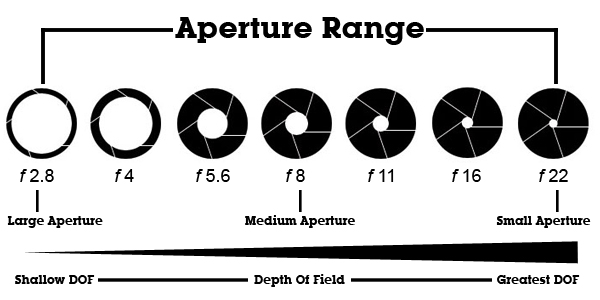
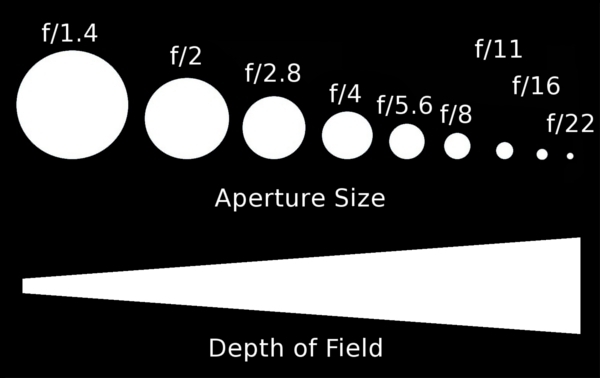
5) USE FAST SHUTTER & LARGE APERTUREYou might lost some of the good action shots if you miss out having good controls on your camera. Freeze that moment with fast shutter, and use depth of field to focus on the Cat to get extraordinary portrait of the Cat.


6) GO ON A LOWER ANGLE
When you are down at their level, it's easier to compose the framing and convey the stories that you want the photo to carry with. That's what people always says, picture is worth a thousand words... however, sometimes depends on the angle too.

7) PLAY WITH THEM
Be patient with them, respect them, play and get into their world. And you'll be able to capture the best out of them. Happy Cats! *Wink*Wink*
8) FOCUS POINT ON THEIR EYESLike any other portraits, we always need a texture to be focus on. Same for shooting Cats, the Eyes is the key to focus on.
FAQ:
What kind of camera do I need to shoot great portrait of Cats photos?
A: 
If it's not action shot, mobile phone cameras are good enough.
What do I need to have?
A: 
A cat & a camera

__
This Blogpost is written & copyrighted by Sgcloudproductions , Thank you for spending time reading our Blog!
3:20 PM

8 AWESOME DIY FOOD PHOTOGRAPHY TIPS

by Label as

8 AWESOME DIY
FOOD PHOTOGRAPHY TIPS

 1. GET THE RIGHT STYLE

Finding the right style is important in food photography. Your photoshoot style might be as simple as putting a plate of salad with a wooden table as a background, or if you are a prop-aholic you might just throw everything around to shoot the the salad in some other ways. Looking at your food uniquely, helps you to frame the photos much better.

2. SOMETIMES NATURAL LIGHT HELPS

Direct sunlight is often too harsh when it comes to using natural light photography. If you love natural lighting, one great tips is to use diffuser to filter the bright light so that your food won't get over exposed (especially the white areas).

3. VARY THE CAMERA ANGLE

Move around to improve composition. Whenever you're trying to pick the best angle for a photo, you should always think about balancing the composition, and the angle that you shoot from makes a huge difference for the horizontal and vertical balance of the photo.

4. GETTING IT CLOSE
Food photographers seem to love the macro settings, always. Too often, people get too close to the food, and it's a little disconcerting and losing perspectives. Sometimes it can be difficult to even identify the subject.
When photographing food there is multiple way to get those mouthwatering shots. One of the best way to make other feel hungry is to focus and show a particular detail and texture of the food.

5. DEPTH OF FIELD

It will be good if you could play around with your aperture settings on your camera and get familiarize with depth of field. Depth of field plays a big part in food photography, as it concentrates and focus on what is in the foreground (the food). Or it can also be used on having multiple of the same food, but having the sharpest details in the foreground and others will be blurred. At some circumstances the food have to be sharp, as well the background can't be too blur. That's when you'll need to get your hands on aperture.

6. USE MORE THAN ONE
Not all food are good with lonely one. Remember "three" is the number for most of the food. And avoid "four" in food photography. You can visualize by thinking about how restaurant served Dim Sum, it always comes in three and it looks good isn't it?


7. CAMOUFLAGE

For tiny food like skittles sweets, shooting just one of it doesn't seems appealing or attractive enough. Sometimes we get massive of the food that we want to shoot to get slightly vibrance & impactful photos.

8. CLEAN UP

We all love flawless food. Food without holes around, black spots, watermelon without too much seeds. A minor clean up in photoshop can help remove distracting spot on your food. Clone, but not too much.

LAST BUT NOT LEAST...

IF FOOD MAKES YOU HUNGRY, MAKE THEM LOOKS TEMPTING TO EAT!

ENJOY SHOOTING!


__
This Blogpost is written & copyrighted by Sgcloudproductions , Thank you for spending time reading our Blog!
3:17 AM

Basic Photo Editing Tips for Beginners!

by Label as
We've some clients who are really curious and eager to know more about the difference of our postprocessed images and the non.
Today we're not only showing you difference of the edited photos and the non, but we're sharing with you TOP FIVE TIPS for editing your photos:
There are plenty of ways to edit photos, it actually depends on what you are looking at. For us, we want to focus on showing the expression and the happy moments behind the photos. So we usually won't touch on too much editing. Our advice is, shoot nicely on your photoshoot day and edit minor. Editing is a tool to do what you or your camera can't do on your actual shoot, and not to rescue faulty photos. Prevent over-editing, as it may destroy the quality of your photos. The 5 GREAT TIPS starts here:
ONE:
Photography terms: Exposure
What it means: Lighting/brightness
In digital photography, exposure is one of the main key for good photos. It's also the measure for total amount of light being captured. Usually Aperture, Shutterspeed & ISO has to be set on shoot to compensate the lighting to its balance. In editing software, you can look at your photo exposure by the histogram at the side to roughly look into the balance.
For extreme cases like shooting the milky way in the dark, the histogram will showed it as underexposed. However, the photos looks alright due to the highlights of the milky way is the main key we want to show and need darkness to be surround it. So overall, brighter or darker exposure and balance depends on situations and not always on histogram chart.

TWO:

Photography terms: Tint/tone/shade
What it means: Highlight/shadows
Highlight and shadow can be quite general and pretty much obvious to human eye. At some point if the shadow that is un-removable from the shoot scenrio, we'll have to do it in postprocess. And when you are adjusting your highlight and shadows, do also take note of the colours changes too. That will lead you to the knowledge of Vibrance & Saturation below:

THREE
Photography terms: Vibrance/Saturation

What it means: Intensity of colours
The diagram show some examples of difference in colours for Hues, Tints, Tones, Shades.

FOUR:
Photography terms: Clarity

What it means: Sharpness
Sharpness play an important role in your photos especially when you need to print it out in the future. Nonetheless, as professionals we are very particular about sharpness & clarity.

FIVE:

Photography terms: Vignetting
What it means: Fading border, that focus into the center of the photo
Vignettes plays a part when you want to surround the subject in the middle of your photos, it somewhat makes it more focus into the center. However, adding too much vignette will make your photos look artificial which is not advisable.
____________________________
Please also do note that:Our photoshoot packages does not include advanced editing such as retouching, which includes distorting, removing subject from the photo or adding things into it. An example for retouched photo and the non :

__
This Blogpost is written & copyrighted by Sgcloudproductions , Thank you for spending time reading our Blog!
9:57 PM

Photoshop Fundamentals: Changing an Image’s Resolution and Size

by Label as

Understanding Resolution


One of the things that can be the hardest to get your head around when you start down the digital path is resolution. This confusion is compounded by the fact that there are two different kinds of resolution in the digital world. One is dots per inch, and the other is pixels per inch.
  1. Dots per inch (dpi). This refers to the number of dots per inch that an inkjet printer is capable of applying to a sheet of paper. It can range from 720 to 2800 and more. The closer these dots are to each other, the more they blend together forming continuous tones on the print. Naturally, this depends on the paper that’s being printed on. If the paper is porous watercolor paper, the dots soak in and blend just fine at lower dpi settings like 720. On glossy photo papers, a higher setting—such as 1440—is needed because the ink dries on the surface. About the only time people discuss dpi is when they are talking about a printer.
  2. Pixels per inch (ppi). This is what is usually discussed when talking about resolution in digital photography. It refers to the distance between the pixels that make up digital images. Pixels per inch is an important setting because it determines what digital images look like when they’re displayed and printed. Sometimes a lower value is desirable, and other times a higher value is preferred.
If you have a file with a resolution of 120 ppi or lower, you run the risk of seeing the space between the pixels when you print. This causes edge detail, which should be smooth in the print, to look jagged. The goal is to get the pixels close enough together so that these single dots form continuous tones and lines. The illustration below gives you an idea of how this works. As the dots get closer to one another, they begin to form a line. When you zoom out, the individual dots disappear. (It’s similar to the idea of getting ink dots close together on a printer (dpi).


(More Photos on Cloudproductions.sg) 

Tip: Keep in mind that some people mistakenly use the terms dpi and ppi interchangeably, saying dpi when they really mean ppi. If they’re not specifically talking about a printer’s output, then they probably mean ppi.
The thing to keep in mind when it’s time to change resolution is that if you have an image file that’s 150 ppi and you simply change its resolution to 300 ppi for printing at a lab, the new image’s dimensions are affected because the distance between the pixels is cut in half. An 8 × 10 becomes a 4 × 5 at 300 ppi.

Doing the Simple Math

I know I just said the dreaded M word, but please keep reading because in the next few paragraphs I show you how to use simple math to understand what Photoshop is doing when you resize your photo files. Begin by getting a better handle on how resolution works. Follow these steps:
  • Choose File > New to create a new file. The New dialog box appears.
  • Set the following attributes, as shown below, and then click OK to open the new file:
    1. Width = 8 inches
    2. Height = 10 inches
    3. Resolution = 150
    4. Choose Image > Image Size (Alt+Command+I/ Alt+Ctrl+I). The Image Size dialog box appears. Notice that the starting dimensions are the same as what you specified with the New File command.
    5. Deselect the Resample Image option. Notice that the Pixel Dimensions area at the top of the Image Size window goes gray when Resample Image is turned off. That means that the number of pixels being used in your image is fixed at 1200 × 1500 pixels.
    6. Deselect the Resample Image option. Notice that the Pixel Dimensions area at the top of the Image Size window goes gray when Resample Image is turned off. That means that the number of pixels being used in your image is fi xed at 1200 × 1500 pixels.
    7. Change the resolution setting to 300. Leave the measurement at pixels/inch. Notice that the size of the image goes from 8" × 10" to 4" × 5", as shown below. That’s because you’re only changing the distance between pixels as you modify the resolution of the file. You have fixed overall pixel dimensions of 1200 × 1500. When you set your resolution to 300 ppi, the math dictates that the image is 4" × 5" (4" × 300 ppi = 1200 pixels, and 5" × 300 ppi = 1500 pixels). When the resolution is set to 150 ppi, the image must be 8" × 10" in size (8" × 150 ppi = 1200 pixels, and 10" × 150 ppi = 1500 pixels).

      Resampling the Image Size

      In the previous example, you were asked to turn off Resample Image because Resample Image has a special function that affects the math involved in resizing an image. When you turned off Resample Image, the Pixel Dimensions remain fixed when you changed the resolution value. Take a look at what happens when Resample is turned on:
      1. Begin with the file you created in the previous set of steps, and return to its original state using the History panel. If you closed it, then go back and complete Steps 1 and 2.

        Tip: If you still have the Image Size window open from the preceding example, you can reset it to the settings it had when you opened it by holding down Alt and clicking Reset—where the Cancel button used to be. This works with almost every dialog box where you see a Cancel button.
      2. Choose Image > Image Size (Alt+Command+I/ Alt+Ctrl+I). The Image Size dialog box appears.
      3. Leave the Resample Image option selected or select it if it isn’t already checked.
      4. Change the Resolution to 300. Leave the dimensions at pixels/inch. Notice that the Image Size remains at 8" × 10". What changed was the Pixel Dimensions at the top of the window. They went from 1200 × 1500 to 2400 × 3000.
      5. Change the Resolution to 600. Now the Pixel Dimensions changes to 4800 × 6000, but the Document Size remains fixed, as shown below.

      Something to notice when comparing the two previous illustrations is the little chain icon that appears to the right of the Document Size settings. This icon indicates that these values are linked. When one value is changed, the other linked value is affected. In the first illustration, where Resample is off, the Width, Height, and Resolution settings are all linked. In the second, where Resample is on, only the Width and Height values are linked. Resolution is not be affected by changes to these values. This is a great way to remember which Resample setting to choose.
      When Resample Image is turned on, modifi cations to Resolution or Document Size in the Image Size dialog box affect only the Pixel Dimensions. When you make an image’s width and height dimensions smaller, or reduce its resolution, resampling takes pixels from the image. This is called downsampling.
      If you make the Document Size larger or increase the Resolution value, resampling adds pixels to the image. This is called upsampling. You can verify that this is taking place by looking at the file size readout next to Pixel Dimensions in the previous illustration. The original file size was 5.15 megabytes (M). Now, with the addition of all the new pixels being added by Photoshop, the file size is 82.4M.
      Tip: There are two different ways to measure a photo file’s size in megabytes. One is the size of the photo when it’s open. This size is determined by the pixel dimensions — width × height × three color channels. This is the size shown next to Pixel Dimensions in the Image Size dialog box. The second measurement is for when the file is saved to disk. Naturally, this varies by the type of file that’s saved. For example, a saved TIFF file is always bigger than a JPEG saved from the same file because the JPEG is compressed. This size is the size shown when you look at the file in your Mac Finder/Windows Explorer.
      Keep in mind that adding lots of pixels to an image can affect the image’s quality. Photoshop is pretty good at upsampling, but only so much can be done. Lots of guesses need to be made on Photoshop’s part when deciding what color to make a new pixel. The quality of the outcome depends on the size and quality of the original file. When a quality file is used, it’s easy to double, and even triple, the size of the file. However, if you push it too far and try to upsample an image beyond Photoshop’s capabilities, you can hit a point of diminishing returns where quality begins to suffer. For projects that require massive upsampling beyond Photoshop’s abilities, look to a plug-in like Genuine Fractals by onOne Software. This plug-in uses fractal math to accomplish some amazing upsampling feats.
      So remember, if you only want to change the resolution of the file, uncheck Resample. If you need to make the image smaller or larger, then Resample must be checked. Use the table below as a recap of the relationships you covered in this section:


      Using the Correct Image Interpolation Method

      There’s one more wrinkle to throw at you before moving on. In the previous examples, you probably noticed a pop-up menu next to Resample Image in the Image Size dialog box, as shown below.
      This box allows you to change the image interpolation that’s used when you resample an image. Different interpolation settings affect the way new pixels are assigned color based on the pixels that surround them. There are five options in this menu:
      • Nearest Neighbor. Fast, but not very precise; best for illustrations with edges that are not anti-aliased rather than photos. It preserves hard edges.
      • Bilinear. Medium quality results with most types of images.
      • Bicubic. Slower but more precise; produces smoother graduations than the two previous methods.
      • Bicubic Smoother. Based on Bicubic Interpolation, but designed for enlarging images.
      • Bicubic Sharper. Based on Bicubic Interpolation, but designed for reducing image size because it maintains the detail of the original image.

      Changing Size and Resolution Together

      Sometimes it’s necessary to change the document size and resolution at the same time. For example, suppose you have a file that’s sized to 8" × 10" at 250 ppi, and you need to change it to a 4" × 5" at 300ppi. Making this change with the Image Size command requires two steps. You can carry out both in one use of the Image Size command:
      1. Choose File > New to open the New dialog box; make the file measure 8" × 10" at 250 ppi.
      2. Choose Image > Image Size (Alt+Ctrl+I). The Image Size dialog box appears.
      3. Deselect the Resample Image option, and change the resolution to 300. Notice that the Document Size changes to 6.67" × 8.33" because you’re moving the pixels closer together.
      4. Select Resample with the Bicubic Sharper option from the Resample Image menu, and change the Document Size Width to 4 inches.
      5. Click OK. Now you have a file that is 4" 4 × 5" at 300 ppi.
    8. Color Mode = RGB Color, 8-bit


      ((SOURCE FROM GRAPHICS.COM))
8:04 PM

10 Most Long Exposure Photography worthy Places in Singapore!

by Label as


Every Countries has its own hidden Gems, the challenge is how to just find them without anyone sharing it with you? Unless you spend all day and night searching for it, otherwise it's not that easy to spot.


Today, we're gonna share the TOP 10 (Non-urban) Landscape Photography Spots you can take really Awesome photos at, in Singapore!


#1 : Changi Boardwalk / Beach (EAST)


Somewhat Stinky and Dirty, some says it's Eerie and Creepy. But at times if the Sunset are nice, you can get Awesome shots with the Rocks in your framing. Don't stay too late, you may see weird things around. 


#2 : Little GuiLin (WEST)


Little GuiLin, also known as Xiao Guilin or Bukit Batok Town Park. It is one of the most convenient Park for Picnics that is just opposite of neighbourhood of HDBs and Condos along Bukit Batok Road. It has this short stretch of walkways and lake where alot of residence here loves to jog around, It's just a 3 min short walk from Bukit Gombak MRT Station. One of the nicest hill in Singapore for some Snaps! 


#3 : Pandan Reservoir (WEST)
This is one of the Reservoir that most people do not know it kind of exist. Right opposite this long stretch of pathway, along West Coast Road is another side of Jurong "Jalan Buroh" and it is a long drive road along Industry areas near Jurong Island. For that reason when you take Night Photography here you'll see Beautiful short buildings lightings and with some smokes motions effects.


#4 : Tuas (WEST)
This photo may looks like it's taken overseas, because most of us don't know that Singapore has Lighthouse too. This Lighthouse is located at "Raffles Marina Clubhouse" at Tuas, it is accessible to Public but Security can be quite strict. You may enter by your own or with a few friends, if you're going in a large group and holding large and obvious cameras or professional looking Equipment you might be stopped halfway through.


#5 : Chinese Garden (WEST)
Singapore Chinese Garden, and when it comes to Landscape Photography it often reminds people about its Iconic Pagoda. More than just their Pagoda, Chinese Garden is actually a quite a beautiful place to play with compositions and shoot it's Characteristic Atmosphere out of it. 


#6 : Woodlands Waterfront Jetty (NORTH)
Woodlands Waterfront Jetty is located right opposite Johor Bahru, Malaysia. It is plain, simple and peaceful at times. If you get the Dreamy looking Sunset, you may be able to get a nice effect of the sea reflection. It works with both the lightings and your compositin. If you're staying late till the Night you may do some shot with Carlight Trails which can be seen on the Causeway Bridge (on the left).


#7 : Lower Seletar Reservoir (NORTH)
Wide Sky, wide Water Reflection, lots of Greeneries and alittle bit of land, at some point especially on a Bright Sunny day you may get great Photos with the Colours you always wanted to have in your image. You can play with many different composition within this Reservoir, especially with the new Shelter built in recent years.


#8 : Upper Seletar Reservoir (NORTH)
And again, wide Sky, wide Water Reflection, alittle Greeneries and a stretch of  land. This is a place where you can shoot your Landscape Panoramas with no urban distractions in your Shots. With some luck, you may get Good skies & sunset and it may turn out looking like a Painting.


#9 : Pulau Ubin (NORTH EAST)
The Popular Island in Singapore that many would love to hop over for Families/Friends outing. If you're not aware, not only does the Beaches or Chek Jawa has very Beautiful and refreshing Sceneries. Take note, just before you end your Chek Jawa walk, there's a path where there are many mud-skippers and Mangrove along the sides. This is the perfect place to take Landscape Photos that are rarely found in Singapore. 


#10 : Punggol Settlement / Beach  (NORTH EAST)
Punggol Beach used to be a Beach where only Wedding Couples would go for Pre-wedding Photoshoots, In recent years after Punggol Settlement was renovated and the Stable next to it was officially opens it became like an Entertainment / Attractions Point in the North East area. With just one look you would probably not know how you can frame your Landscape photography. My suggestion is, take off your shoe and go down to the Beach. 


We hope these Information helps you locate all the Great Non-Urban Landscapes spots in Singapore and maybe you will explore further and found out greater ones within these locations, Enjoy your Photoshooting!
___________________________________________
Love our Newsfeed? Look us up, and follow us:

__
This Blogpost is written & copyrighted by Foodwanderers , Thank you for spending time reading our Blog!